


Lightroom Classic 16 · November 2026
Lightroom Classic 16 came out on November 10, 2026. It brings real glow and halation, color grading inside masks, AI depth masks on any photo, AI blemish removal and a vectorscope. Below, each feature has a small hands-on demo, so you can feel how it works before you open Lightroom.
The demos are simplified simulations that run in your browser. They show how each tool thinks, not Lightroom's own rendering.
I have used Lightroom since version 3, back around 2010, and it is still my go-to tool. My favorite update ever was the arrival of Profiles, although if you remember, that transition was a bit of a nightmare. I enjoy every update, and this one has me most excited about the light effects.
Glow: Diffusion, Bloom, Halation, Motion and Streak
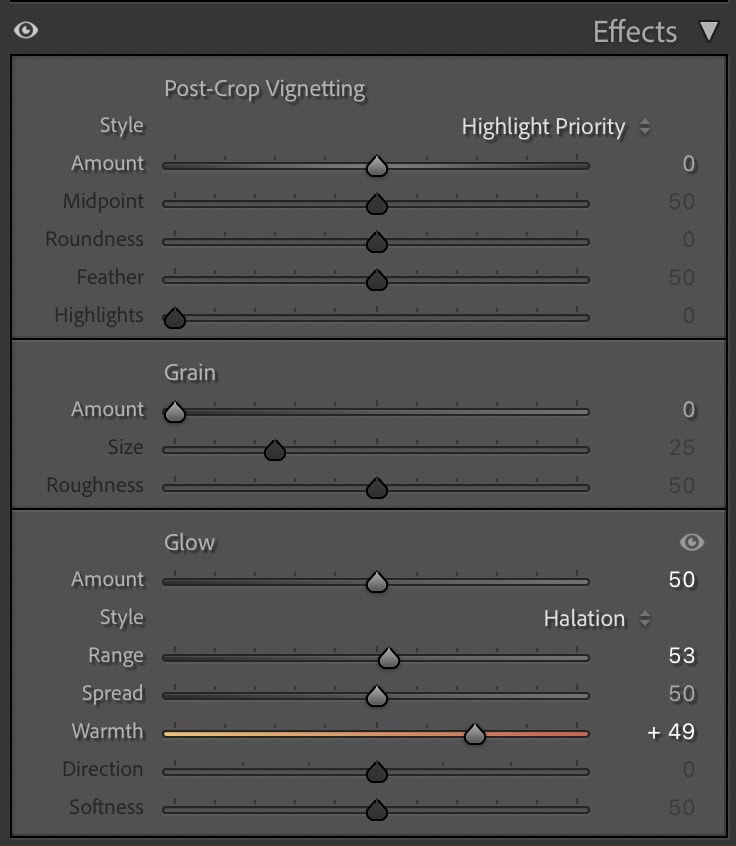
Glow makes bright light spill into the photo around it. Choose a Style, then set how strong it is with Amount. Range picks which tones glow: keep it low and only the brightest lights glow, push it up and the glow reaches into the midtones. Spread sets how far the light travels, and Warmth makes it cooler or warmer.
Halation is the film one. On film, bright light passes through the emulsion, bounces off the back of the film and exposes it a second time, which leaves a warm red or orange rim around highlights. Warmth moves that rim from orange toward red.
A browser simulation of the idea: highlights picked by Range, blurred by Spread, tinted by Warmth, and added back over the photo.
Where is it in Lightroom? Develop, Effects panel

In Lightroom
- In the Develop module, open the Effects panel and find the new Glow section.
- Pick a Style: Diffusion, Bloom, Halation, Motion or Streak.
- Raise Amount, then set Range, Spread and Warmth. Motion and Streak also have Direction and Softness.
- To glow only part of the photo, add a mask and use Glow inside the mask's Effects.
Adobe also ships ten glow presets, in the Presets panel under Style: Glow: Sheer and Dream (Diffusion), Soft Bloom and Strong Bloom, Gentle Aura and Amber Aura (Halation), Fast Motion and Slow Motion, and Cinematic Glow and Cinematic Flare (Streak). They are a quick way to see what each style can do.
Film tip: for night photos, use Halation with a low Range, so only the street lights and signs pick it up. For daylight portraits, try Diffusion at a low Amount. It takes the digital edge off without blurring the detail.
Before 16, I chased this look the hard way: an Orton effect built in Photoshop, and a Pro-Mist filter on my lens to soften photos in camera. Nothing will ever beat real film, but Halation is a real step closer, and it is the new tool I expect to use most.
My one piece of advice: like any new toy, it is easy to go overboard at the beginning. Use it when the photo calls for it, add just the right amount, or none at all.
The Vectorscope, and the skin line
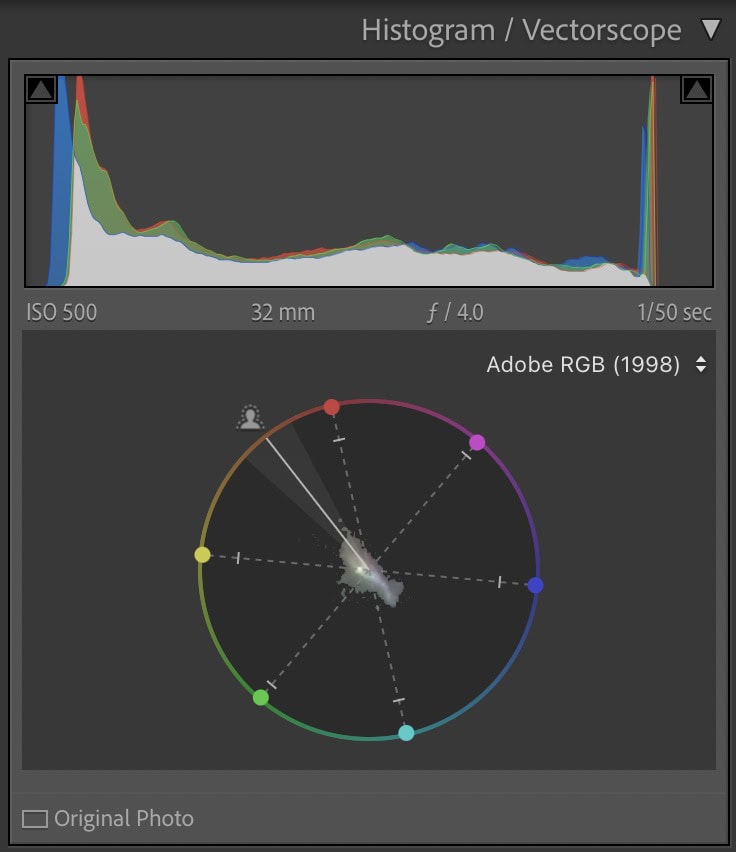
A vectorscope maps every color in your photo onto a circle. The angle around the circle is the hue, and the distance from the center is the saturation, so gray and white sit in the middle and strong colors reach toward the edge. The diagonal line is the skin line, where natural skin tones usually fall, whatever the person's skin color.
It is a tool video colorists have used for years. For a photographer it answers one question fast: did my edit push the skin toward green or magenta?
The scope here plots in sRGB with the Standard layout. Lightroom can also plot in Adobe RGB, Display P3, Rec. 2020 or ProPhoto, with a Standard or Right-origin layout.
Where is it in Lightroom? Right-click the Histogram

In Lightroom
- Right-click the Histogram and choose Show Vectorscope.
- Read it: hue by angle, saturation by distance from the center, skin along the skin line.
- Pick the color space it plots in, and the Standard or Right-origin layout.
- In the Masking panel, hover over the photo to see where the color under the cursor lands.
I will leave this one open while I edit. If you have built LUTs or graded color in software like DaVinci Resolve, a vectorscope is a familiar friend, and having one in Lightroom is a bonus.
I still trust my eye first. My wife and I play a silly game at the grocery store: I fill the cart, and we both guess the total before checkout. Editing works the same way. I make my call by eye, then see what the scope says.
Color Grading inside masks
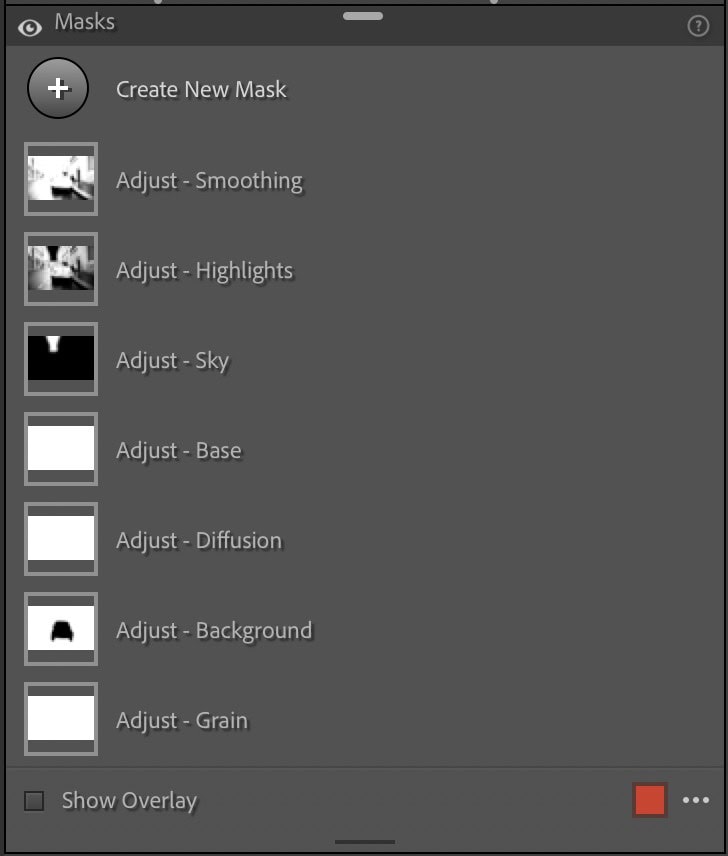
Until now the color grading wheels worked on the whole photo. In Lightroom Classic 16, every mask has its own Color Grading section with shadow, midtone and highlight wheels. So the subject and the background can each get their own grade: the classic warm subject against cool shadows, done properly.
Where is it in Lightroom? The Masks panel

In Lightroom
- Open Masking and choose Subject. Scroll to the new Color Grading section and warm the midtones.
- Create a second mask for the background (Background, or invert the subject).
- In that mask's Color Grading, push the shadows toward teal.
Being able to separate colors and grade them apart is a welcome feature, and anything that expands creativity is a bonus. I will use it mostly on skin and sky.
If I could ask for one thing, it would be faster loading AI masks. Then I think about how long it takes to develop film, and the wait stops mattering.
Depth Range on any photo
Depth Range has been in the masking menu for years, but it only worked on photos that carried depth data, which mostly meant phones. In Lightroom Classic 16 it works on any photo, because Lightroom builds an AI depth map for you. You choose a slice of distance, and the mask follows it.
Show Depth Map: white is near, black is far. This depth map is an illustration drawn from the street's perspective, not Lightroom's AI map.
In Lightroom
- Open Masking, choose Range, then Depth Range. Lightroom analyzes the photo.
- Click a spot to sample its distance, or drag over an area.
- Drag the handles on the Depth Range control to take in more of what is nearer or farther.
- Turn on Show Depth Map to see what Lightroom sees, and use Invert to flip the selection.
Tip: zoom in on the edges of your subject. If the mask misses them, add to it with a brush or Select Subject.
To be honest, I have not played with Depth Range much yet, and I plan to. Right now I would reach for it when I need to change something in a photo that I could not get with the lens, like a background I wish had fallen away more.
AI Blemish Removal
Click Apply and Lightroom finds the blemishes and the natural marks on every face in the photo. Then two sliders decide what goes. Blemishes sets how many temporary spots are removed: at 100 it removes everything it found, lower values remove only the most obvious ones. Natural Marks is separate, for moles and freckles. It starts at 50, which softens them.
A drawn skin swatch, not a real face, to show what each slider does.
In Lightroom
- Pick the Remove tool, open Distraction Removal, then Blemishes, and click Apply.
- Set Blemishes and Natural Marks. With a group, work on each face or on All People.
- If it takes a beauty mark you want to keep, or misses a spot, click Refine and brush with Restore or Remove.
This one I will need to get used to. I still like bringing my photos into Photoshop for final touches, and I mostly leave skin alone. If you retouch a lot of portraits, it is worth a try.
Focus Points
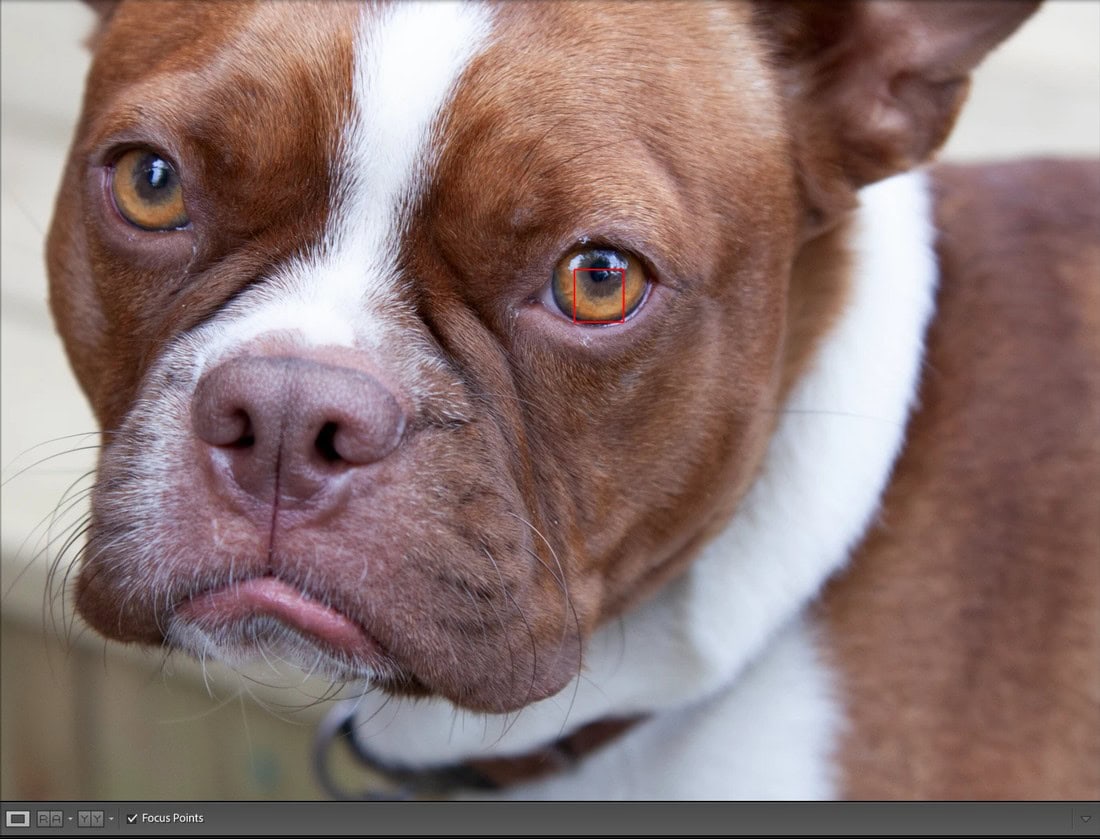
Lightroom can now show where your camera focused. The red box is where focus locked, and the gray boxes are the other focus points the camera recorded. It is a quick way to see why a shot came out soft, or to pick the sharpest frame in a burst.
An illustration of the overlay. In Lightroom the boxes come from the autofocus data your camera wrote into the raw file.
Where is it in Lightroom? The toolbar under the photo

In Lightroom
- Open a photo in Loupe view in Library or Develop.
- Right-click and choose Show Autofocus Points, or tick Focus Points in the toolbar under the photo.
It works with original raw files from Canon, Nikon and Sony cameras that record autofocus data. Smart Previews and DNG proxies may not carry it.
This is like getting a test back with the wrong answers marked. It is nice to see where you missed, so you can find ways to improve your focus and your photography.
The Projection slider
Wide-angle lenses keep straight lines straight, but they stretch anything near the edges of the frame. Faces at the ends of a group shot turn into ovals. The new Projection slider in Upright pulls the edges back into shape.
A drawn diagram of the geometry, not Lightroom's correction.
A wider white balance range
On raw files the Temp slider used to stop at 2,000 Kelvin. It now goes down to 1,500. On JPEGs, it goes from minus 100 to minus 150. That is more room to neutralize very warm light, like candles and lanterns.
A simplified white balance model on a JPEG, to show the direction of the slider.
Everything else in 16
Your own Masking panel
Right-click any section in the Masking panel. Customize Masking Panel lets you put the sections in your own order. Customize Favorites pins the sliders you use most into a Favorites section. Solo Mode keeps one section open at a time, and Expand All and Collapse All do what they say. Restart Lightroom to see your new layout.
Import filters
The Import window has a new filter bar. Bring in only the shots you want by the star ratings and color labels you set in camera, by protected status, or by file type. The filters carry over into Assisted Culling.
Clear history steps
If your catalog has grown huge, clear the history steps for a photo, a folder or a collection, by hand or on a schedule. Your photos keep their current look. Only the step by step history goes.
Cameras and lenses
As always, there is support for new cameras and lenses, more cameras for tethered shooting, and bug fixes.
The new Masking panel layout is my favorite of the small changes. Masking is a small bridge to Photoshop, and it can create some really cool effects. Anything that gets me closer to a film look is what I use masks for.
What Lightroom Classic 16 means for your presets
We updated with our whole Creative Flow library installed, and every preset and profile file came through unchanged.
Presets made before version 16 do not know Glow exists, so applying one leaves your glow alone. We tested it: add Halation, click a different film preset from The Creative Flow, and the glow stays. The order is simple: apply your preset first, then add your glow. And Lightroom 16 saves Glow in presets, the way Adobe's own Style: Glow presets do, so a favorite halation can become a one-click preset.
Should you update? Yes. More toys to play with. Sometimes just knowing a tool is there, and having a feel for what it does, means you will recognize the perfect moment to use it, or it will push your creativity. If you are learning, you are growing.
What I would love to see next: all the different grain types Capture One has, here in Lightroom. And faster AI masks.
Questions
When did Lightroom Classic 16 come out?
Adobe released Lightroom Classic 16.0 on November 10, 2026, during Adobe MAX week. Update it from the Creative Cloud app.
What is the new Glow in Lightroom Classic 16?
A new section in the Effects panel with five styles: Diffusion, Bloom, Halation, Motion and Streak. Amount sets the strength, Range picks which tones glow, Spread sets how far the light travels, and Warmth makes it cooler or warmer. Glow also works inside masks.
How do I open the Vectorscope in Lightroom Classic?
Right-click the Histogram and choose Show Vectorscope. The angle around the circle is the hue, the distance from the center is the saturation, and the skin line marks where natural skin tones usually fall.
Does Depth Range work on any photo now?
Yes. Lightroom Classic 16 builds an AI depth map for photos that have no depth data. Open Masking, choose Range, then Depth Range, sample a distance and drag the handles.
Do my presets still work in Lightroom Classic 16?
Yes. We updated with The Creative Flow installed and every preset and profile came through unchanged. Presets made before version 16 also leave a glow alone, so you can apply a preset first and add Glow after.
The Creative Flow
1,200 presets and 1,200 profiles in 37 collections, from portrait and wedding to landscape, cinematic, vintage and film, for Lightroom Classic and Camera Raw.